





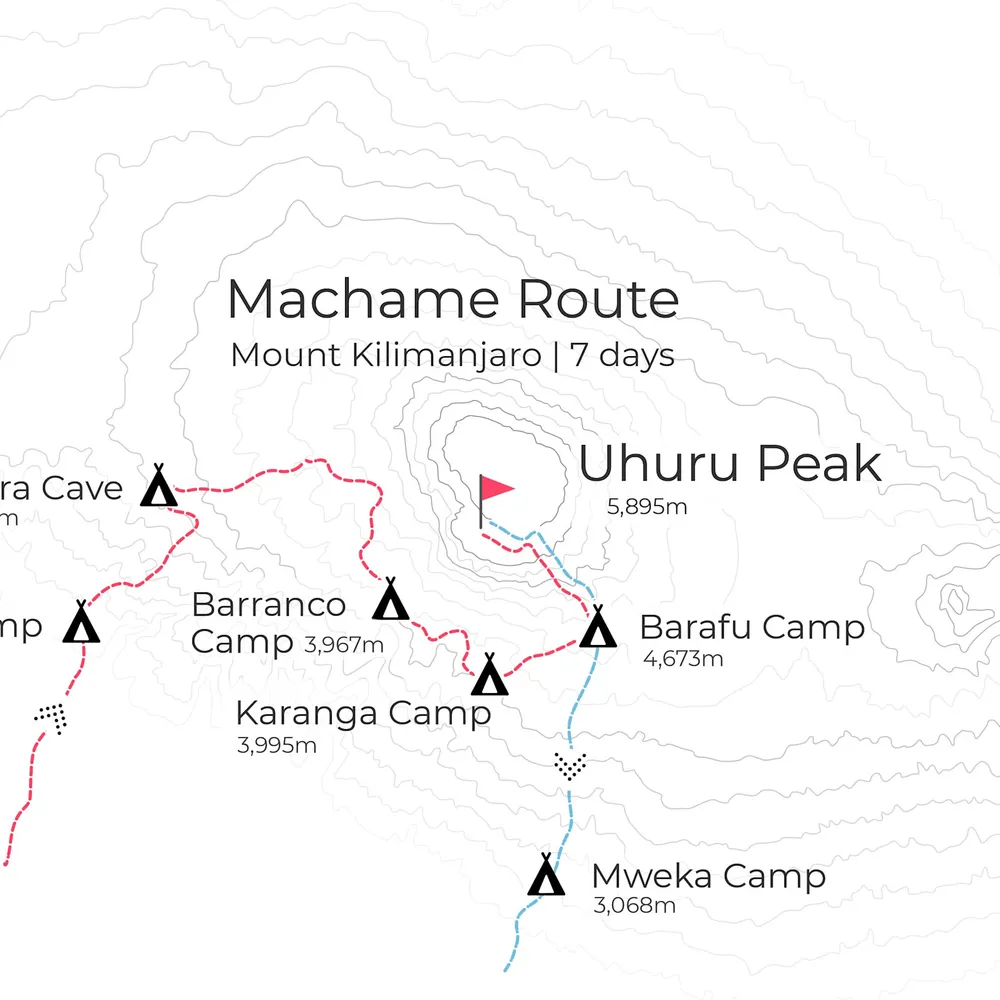
Tackling Mount Kilimanjaro via the Whiskey Route demands careful preparation, high physical endurance, and a firm grasp of high-altitude adaptation strategies. The 7-day variation of this classic trail stands out as one of the single most reliable frameworks for reaching Africa's highest point safely. By spacing out the intermediate camps, this route utilizes a proven alpine approach: climbing high to challenge your body during the day, and dropping down to sleep in denser air at night. This systematic structure gives your body the best environment to adapt to changing atmospheric pressures naturally.
The Strategic Advantage of the 7-Day Architecture
Many mountaineers make the mistake of attempting this route within a compressed 6-day window, often bypassing the vital rest stop at Karanga Camp. Choosing the extended 7-day option introduces an intermediate night that breaks up the long, tiring march from the deep valleys of Barranco directly to the high slopes of Barafu Base Camp. This additional time allows your blood chemistry to stabilize, helping you retain core energy before launching into the freezing midnight summit run.
When calculating your expedition calendar, it is highly beneficial to review how to choose best time to climb kilimanjaro to ensure your travel dates align with clear weather windows. To set yourself up for long days on these rugged trails, implementing an aggressive training regimen beforehand is essential; discover how to train for Kilimanjaro climbing to properly build up your core strength and leg endurance.
Comprehensive Daily Breakdown of the 7-Day Itinerary
Day 1: Machame Gate to Machame Camp
Your expedition begins at Machame Gate, sitting comfortably at 1,800 meters. The trail takes you deep into a dense, humid rainforest zone filled with ancient mosses and giant ferns. The underfoot path can get slippery, requiring slow, deliberate steps to prevent early muscle strains. After an easy 5 to 7 hours of hiking, you arrive at Machame Camp at 2,835 meters, where the tree line begins to thin out.
Day 2: Machame Camp to Shira 2 Camp
Leaving the canopy behind, the trail steepens quickly as you emerge into the alpine heath and moorland zone. The humid rainforest gives way to open, wind-swept ridges where the sun can be intense. You cross several rocky ridges and wild volcanic ravines, navigating exposed paths that test your footing and stamina before arriving out onto the wide, expansive Shira Plateau. This vast volcanic plateau is one of the largest high-altitude calderas on earth.
Throughout this leg, the landscape shifts dramatically, showcasing unique high-altitude flora such as the prehistoric Giant Lobelias and endemic Groundsels. This steady push gains roughly 1,000 meters of elevation, making it a critical day for early altitude adjustment. It requires a disciplined, slow pace—locally known as "Pole Pole"—to prevent early exhaustion as the atmospheric pressure begins to drop. Your day ends at the scenic Shira 2 Camp at 3,850 meters, which offers clear, open views of the western breach and a spectacular, unforgettable sunset above a blanket of clouds.
Day 3: Shira 2 Camp to Lava Tower to Barranco Camp
This is a fundamental acclimatization milestone on your journey. You march due east up a barren, rock-strewn desert slope to reach the towering volcanic plug of Lava Tower at 4,630 meters. Spending an hour eating lunch at this raw height triggers your body to produce more red blood cells. Afterward, you head down through the unique Senecio forest to sleep at Barranco Camp, located at 3,900 meters. This strategic drop in elevation allows your body to rest and recover efficiently overnight.
Day 4: Barranco Camp to Karanga Camp
Your morning begins with an exciting, non-technical scramble up the imposing Barranco Wall. Using your hands and feet for stability, you move steadily across narrow ledge paths before dropping into the dry valleys of Karanga. This short, focused 4-hour trek brings you to Karanga Camp at 3,995 meters, giving you an entire afternoon to rest, hydrate, and save your physical strength.
Day 5: Karanga Camp to Barafu Camp
The trail connects smoothly with the Mweka descent path, turning upwards across a stark alpine desert landscape. Cold mountain winds sweep across the loose gravel slopes as you approach Barafu Base Camp at 4,673 meters. Upon arrival, your crew will set up your tents on narrow, rocky ridges. It is vital to check your gear early; ensure you know how to choose the best sleeping bag for Kilimanjaro to protect against the freezing midnight air. You will turn in for an early dinner to prepare for the midnight wakeup call.
Day 6: Barafu Camp to Uhuru Peak to Mweka Camp
Waking up at midnight, you begin the challenging final ascent in darkness, guided by the glow of your headlamp. You step rhythmically up steep, switchback paths of loose volcanic ash, reaching Stella Point at 5,756 meters just as the morning sun begins to rise over the horizon. Pushing past the massive, glittering glaciers for another hour brings you to Uhuru Peak, the roof of Africa at 5,895 meters. After celebrating briefly at the summit, you turn back and descend rapidly through the loose gravel to Barafu for a quick rest, then continue down into the moorlands to sleep at Mweka Camp at 3,100 meters.
Day 7: Mweka Camp to Mweka Gate
Your final morning features a pleasant, steady downhill walk through the lush montane forest zone. The air grows warmer and richer with oxygen with every step. At Mweka Gate, you sign the official park registry and receive your green or gold climbing certificates. This marks the successful completion of an incredible adventure.
Summary Altitude and Trekking Profile Table
This compact summary table highlights the elevations, hiking times, and primary ecological zones for each step of the journey:
| Day | Target Endpoint | Elevation (m) | Hiking Time | Primary Ecological Zone |
|---|---|---|---|---|
| Day 1 | Machame Camp | 2,835m | 5 - 7 Hours | Rainforest Canopy |
| Day 2 | Shira 2 Camp | 3,850m | 4 - 6 Hours | Low Moorland Ridge |
| Day 3 | Barranco Camp | 3,900m | 6 - 8 Hours | Semi-Desert / Alpine |
| Day 4 | Karanga Camp | 3,995m | 3 - 5 Hours | Alpine Desert Valley |
| Day 5 | Barafu Base Camp | 4,673m | 3 - 4 Hours | High Mountain Desert |
| Day 6 | Uhuru Peak Base | 5,895m | 11 - 15 Hours | Arctic Glacial Ridge |
| Day 7 | Mweka Gate Outlet | 1,800m | 3 - 4 Hours | Montane Rainforest |
For official trail notices, environmental guidelines, and national park mapping data for Mount Kilimanjaro, you can consult the updates published by the Tanzania National Tourism Portal.
More In-Depth Insights & Strategic Planning Factors
Click the Read More Insights buttons below to open deep operational details on tackling the trail safely without changing your current page view.
Frequently Asked Questions (FAQs)
What is the average success rate for the 7-day Machame itinerary?
The 7-day Machame route maintains an exceptional historical success rate of over 85%. This high percentage is due to the excellent acclimatization provided by the extra day spent resting at Karanga Camp before pushing to base camp.
Scientific References & Trail Resources
To maintain accuracy, our training recommendations and altitude safety rules are based on clinical resources from the CDC Travelers' Health Yellow Book and official mountain management protocols from the Tanzania National Parks Authority (TANAPA).