





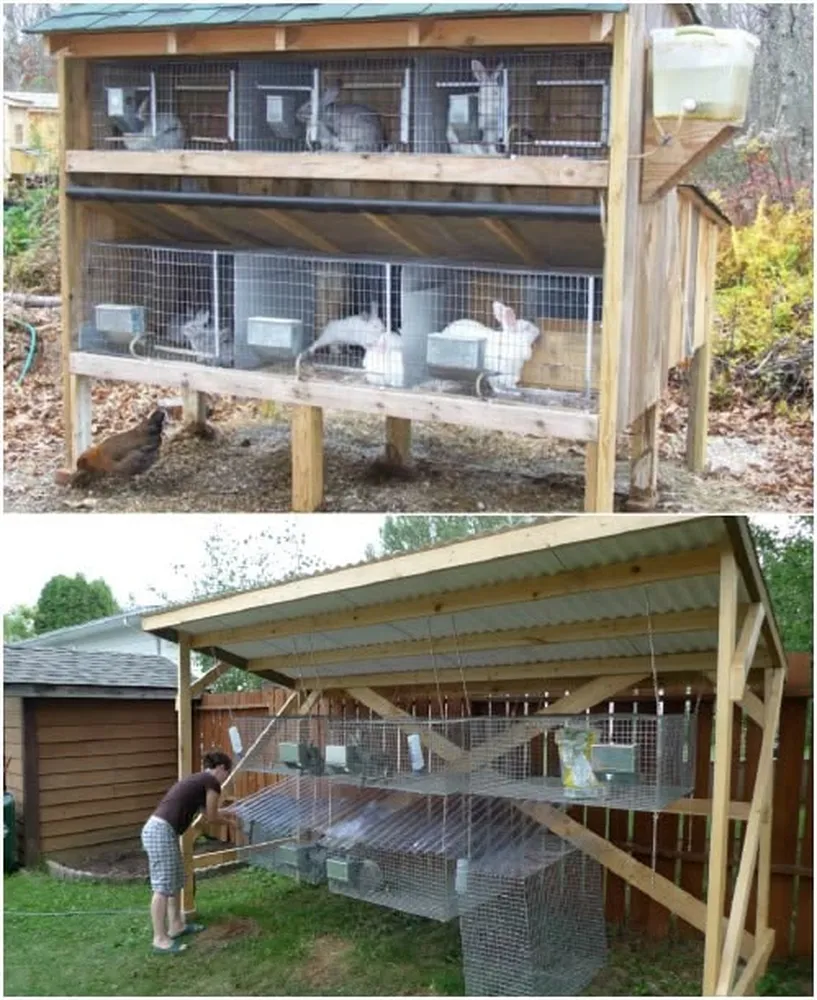
Learning how to build a cheap rabbit hutch is an excellent way to provide your pets or homestead animals with a safe, cozy home without spending hundreds of dollars on commercial cages. By selecting budget-friendly materials and using a straightforward structural layout, you can finish this functional carpentry project in a single afternoon. This complete article details exactly how to build a cheap rabbit hutch, providing a cost breakdown, an essential tools checklist, step-by-step assembly instructions, and vital safety considerations to keep your animals thriving.
Hutch Planning & Dimensions
Before picking up a saw, you must establish the proper size for your habitat. Skimping on space to save pennies will result in an uncomfortable environment that causes stress or behavioral problems. A single small-to-medium rabbit requires an absolute minimum footprint of 4 feet long by 2 feet wide. If you have multiple animals, or if you are busy learning how to raise chickens for eggs in the backyard alongside your rabbit breeding program, managing your ground space wisely is key.
A smart layout separates the enclosure into two distinct zones: an open, breezy viewing area covered in mesh wire, and an enclosed, private wooden nesting box where your rabbits can hide from sudden frights, cold winds, or downpours.
Material Requirements & Budget Estimates
To build a high-quality shelter while keeping costs low, look for raw, untreated pine boards at your local hardware supplier, or clean up discarded wooden shipping pallets. Avoid any wood that has been treated chemically, as rabbits naturally chew on their surroundings to keep their teeth sharp, and toxic chemicals can cause fatal poisoning.
| Material Name | Estimated Cost | Purpose |
|---|---|---|
| Pine Lumber (2x4 & 1x2) | $15 - $25 | Structural framework and door panels |
| Plywood Sheet (1/2 inch) | $12 - $18 | Back walls, floor base, and nesting box partition |
| Hardware Cloth (Wire) | $10 - $15 | Heavy-duty protection on windows and floor doors |
| Screws, Hinges & Latches | $8 - $12 | Securing moving parts and building frame links |
Make sure to purchase 1/2-inch or 1/4-inch galvanized wire mesh hardware cloth. Avoid flimsy poultry netting; predators like stray dogs or wild raccoons can rip thin chicken wire apart in seconds. For specific insights on protecting other farm varieties from outdoor threats, review our detailed guide on how to treat bumble foot in chickens naturally.
Step-by-Step DIY Construction Guide
Follow these structural phases carefully to ensure a square, sturdy, and stable finish.
Step 1: Frame Assembly
Cut four vertical legs out of your heavy 2x4 timber. If your setup will stay outdoors in a grassy backyard yard, make the two front legs 30 inches long and the back legs 26 inches long. This height difference creates a natural slope for the roof, allowing rain to run right off the back instead of pooling on top. Link these legs securely with horizontal 1x2 support rails using exterior wood screws to form a rigid box framework.
Step 2: Install Floor and Mesh Windows
Roll your galvanized wire sheet across the bottom section of the frame. Staple it down tightly every 2 inches along the joists. A wire bottom allows waste pellets to drop through easily into a cleanup bin below, keeping the living quarters dry and sanitary. If you are keeping large breeds, cover half of the floor area with solid plywood so the hard metal wire won't irritate their sensitive feet over time.
Step 3: Construct the Hidden Nesting Compartment
Cut a thin piece of plywood to fit vertically inside the frame, separating the last 15 inches of space. Cut an arched, smooth opening that measures 7 inches wide inside this interior wooden wall so your pet can hop through comfortably. Nail this wall into place. Cover the outer backside and the side profile of this nesting room with solid wood panels to keep it dark and sheltered.
Step 4: Attach Weatherproof Roof and Hanging Doors
Place a wide sheet of plywood over the top frame, ensuring it extends out 2 inches on all sides to protect the walls from rain. Secure it down firmly. Cover the top layer with corrugated plastic roofing sheets or leftover asphalt shingles to prevent water leaks. Next, build two simple door frames using light 1x2 wood strips. Wrap one door in wire mesh for ventilation and cover the other door in solid wood for the nest box. Attach them using rust-resistant steel hinges and mount strong barrel bolt latches to prevent clever pets or predators from twisting them open.
Ventilation and Safety Measures
Rabbits are highly sensitive to hot weather and stuffy air. When placing your brand-new homemade hutch, choose a shady spot out of direct sunlight. High humidity can attract harmful flies, while damp floors can lead to serious health problems, much like how damp goat pens require careful management when you learn how to take care of a newborn goat kid. Ensure plenty of cool air circulates through the wire side panels continuously.
During severe mid-summer heatwaves, you can place frozen water bottles inside the run to give your pets a cool spot to lean against. For more advice on keeping your animals safe in summer, check out our guide on how to keep farm animals cool in extreme heat. For professional care guidelines, you can also consult the official safety tips on the RSPCA Website.
Frequently Asked Questions
What is the safest, most budget-friendly wood for a rabbit hutch?
Untreated kiln-dried pine framing boards or clean, raw shipping pallets are the cheapest and safest materials. Avoid cedar, redwood, or pressure-treated timber, as their natural oils and chemical treatments are toxic to small animals.
How can I protect my cheap homemade hutch from outdoor predators?
Always use heavy galvanized hardware cloth instead of standard thin chicken wire, and install strong metal barrel-bolt latches. Simple toggle or hook-and-eye latches can easily be bumped open by smart predators like raccoons.
Does a rabbit hutch require an insulated nesting box?
Yes, rabbits need an enclosed, wind-resistant nesting box packed with clean straw or wood shavings to hide in, regulate their body temperature, and feel safe during storms.
Conclusion
Learning how to build a cheap rabbit hutch is a rewarding DIY project that saves you money while providing a safe, custom home for your rabbits. By using untreated lumber, sturdy wire mesh, and a practical layout with separate nesting and viewing zones, you create a healthy environment where your pets can thrive. Grab your tools, follow these steps, and enjoy building an affordable habitat for your backyard homestead.