





Learning how to make soft chapati at home is a culinary skill that elevates any homemade meal. Whether you pair it with a rich stew or a simple vegetable side dish, a perfectly soft, flaky flatbread makes all the difference. Many home cooks struggle with flatbreads turning tough or cardboard-like within an hour of cooking. This guide breaks down the core science, essential measurements, and foolproof steps to achieve pillow-soft layers that stay fresh for up to 48 hours.
The Key Elements of Softness
Achieving structural softness relies heavily on gluten development and moisture retention. Unlike making complex pastries, chapati relies on simple mechanics. First, utilizing lukewarm liquids activates the flour's starches and relaxes gluten proteins quickly. Second, a dedicated resting period allows moisture to distribute evenly throughout the dough matrix, making it highly pliable during rolling.
If you are planning an entire meal from scratch, coordinating your starch textures is essential. For instance, understanding how to cook fluffy white rice perfectly can help you balance your dinner menu options between light grains and rich, soft flatbreads.
Ingredients and Ratios
Precision yields consistency. Using the right balance of dry and wet ingredients eliminates the guesswork out of your kitchen routine. High-quality unbleached all-purpose flour or traditional whole wheat Atta flour works best for this recipe.
| Ingredient | Amount | Purpose |
|---|---|---|
| Flour (Atta/All-Purpose) | 3 Cups | Base Structure |
| Warm Water | 1.25 Cups | Hydration |
| Vegetable Oil/Ghee | 2 Tbsp | Tenderness & Layers |
| Salt | 1 Tsp | Flavor Enhancement |
Step-by-Step Preparation Process
Follow these operational phases carefully to build internal layers that naturally trap steam during the frying stage:
- The Initial Mix: Sift your flour into a spacious bowl and whisk in the salt. Create a well in the center, adding one tablespoon of oil alongside the warm water.
- Kneading Phase: Incorporate the flour gradually. Knead vigorously for approximately 8 to 10 minutes. If the mixture feels excessively sticky, dust it lightly with extra flour. The end goal is a supple, non-sticky ball.
- The Resting Window: Coat the dough ball surface with a thin layer of oil. Cover the bowl securely using a damp kitchen towel or plastic wrap. Allow it to rest undisturbed for 30 minutes. This is a non-negotiable step for softness.
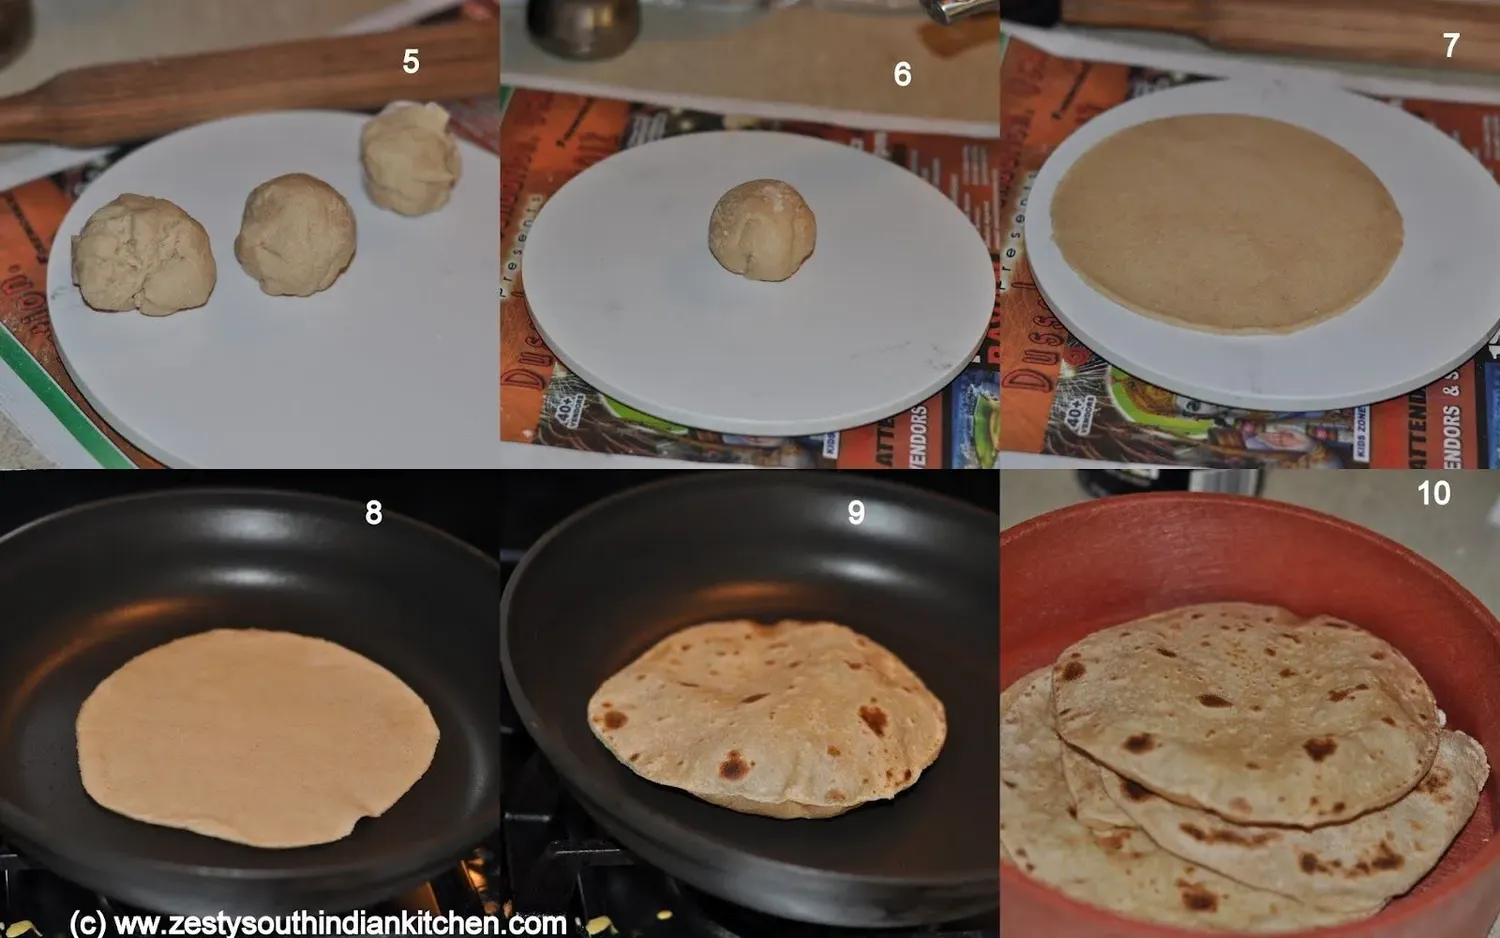
- Layering Technique (Coiling): Divide your rested dough into equal-sized balls. Roll a ball out into a thin circle using a rolling pin. Brush the surface lightly with oil or melted ghee. Cut a straight line from the center outward, roll it clockwise into a cone shape, then press it downward to form a layered disk.
- Final Rolling: Roll the coiled disk gently out into a neat 7-inch circle. Avoid applying excessive force, as heavy pressing can compress the internal layers and prevent proper separation during cooking.
Mastering this rolling method creates beautiful concentric circles inside the dough. This layering concept is highly reminiscent of classic skillet traditions across East Africa. For an authentic regional dining combination, pair your fresh bread with a rich pot of spiced rice by reviewing our detailed guide on how to cook pilau rice East African style.
The Cooking Stage: Heat and Timing
The cooking surface temperature dictates the final texture of your bread. A skillet that is too cold will dry out the moisture, turning the dough into a brittle cracker. Conversely, a scorching hot pan burns the outside while leaving the interior raw.
Preheat a heavy cast-iron skillet or non-stick tawa over medium-high heat. Place your rolled dough onto the dry pan. Cook for 40 seconds until small bubbles emerge on the surface. Flip the bread over and spread half a teaspoon of oil across the cooked side using the back of a spoon. Flip once more, applying oil to the opposite side while pressing the edges gently down with a clean cloth or spatula to induce puffing. Total pan time should not exceed 2 minutes.
Pro Tips for Fresh Storage
As soon as a chapati leaves the skillet, transfer it immediately into an insulated container lined with clean paper towels. The paper towels absorb excess surface steam, preventing the bottom layers from becoming unpleasantly soggy while retaining internal heat.
If you enjoy creating restaurant-quality textures across different types of comfort foods, precision handling is always required. Whether managing starch conversion when learning to make how to make crispy french fries like a restaurant or trapping moisture in flatbreads, controlled temperature applications remain paramount. For official food safety guidelines regarding household dough storage and temperature management, you can refer to the U.S. Food and Drug Administration (FDA) resource portal.
Frequently Asked Questions
Why do my chapatis turn hard after cooking?
This typically occurs due to insufficient dough hydration, skipping the mandatory 30-minute resting period, or cooking over low heat for too long, which robs the flatbread of its essential moisture.
Does hot water make chapatis softer?
Yes, hot or lukewarm water helps break down and relax the tough gluten strands within the flour much faster, yielding a highly pliable dough that stretches easily and stays tender after cooling.
Can I store the dough in the refrigerator?
Absolutely. You can store your prepared chapati dough inside an airtight container in the fridge for up to 48 hours. Ensure you allow it to come completely back to room temperature before rolling.
Conclusion: Perfect Soft Flatbreads Every Single Time
Conclusion: Perfect Soft Flatbreads Every Single Time
Learning how to make soft chapati at home comes down to respect for hydration and heat control. By using warm liquids, allowing the flour ample time to rest, and maintaining a solid medium-high pan temperature, you eliminate the risk of hard, dry bread. Practice the simple layering technique to impress guests with beautiful, delicate layers that peel apart effortlessly at the dinner table.